Architecture
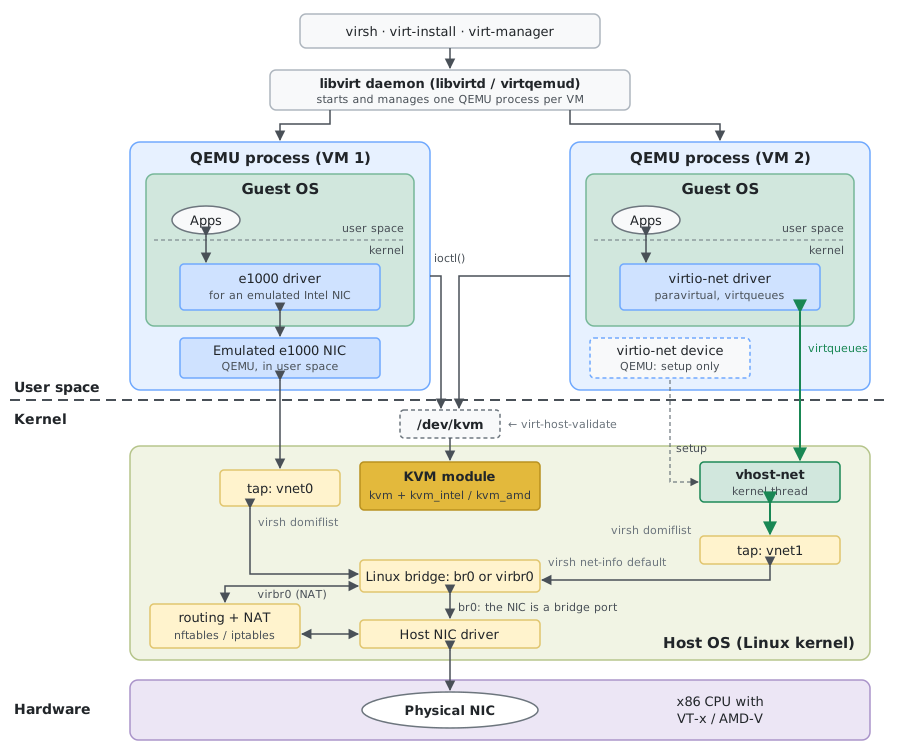
- libvirt (
virsh, virt-install, virt-manager) starts and manages one QEMU process per VM. - QEMU runs the guest’s CPU through the KVM kernel module, via
ioctl() calls on /dev/kvm. KVM uses the CPU’s VT-x or AMD-V extensions. - Emulated NIC (e1000, VM 1): every packet goes through the NIC emulated by QEMU in user space, then to the VM’s tap device in the host (
vnet0, … in virsh domiflist). - virtio-net (VM 2): with vhost-net, which libvirt uses by default when
/dev/vhost-net exists, packets go from the guest’s virtqueues straight to a vhost-net kernel thread and the tap device. QEMU only sets it up, which is why virtio is much faster (see Recommended Settings). - Bridge: the tap devices are ports of a Linux bridge. With your own
br0, the physical NIC is a port of the same bridge. libvirt’s NAT network virbr0 (virsh net-info default) has no physical port: the host routes and NATs its traffic (nftables or iptables) before it reaches the NIC.
Host Check
# Check KVM, IOMMU and cgroup support in one go (PASS / WARN / FAIL per line)
virt-host-validate qemu

# CPU virtualization extensions (vmx = Intel VT-x, svm = AMD-V); 0 means none or disabled in firmware
grep -cE 'vmx|svm' /proc/cpuinfo

# KVM modules loaded and the device present
lsmod | grep kvm
ls -l /dev/kvm
VM States
| State | Description |
|---|
running | The domain is currently running on a CPU |
idle | The domain is idle — waiting on I/O or has nothing to do |
paused | Paused via virsh suspend — still consumes memory but not scheduled |
in shutdown | Shutting down — guest OS notified and stopping gracefully |
shut off | Not running — fully shut down or not yet started |
crashed | Ended violently — only if configured not to restart on crash |
pmsuspended | Suspended by guest power management (e.g., S3 sleep state) |
VM Lifecycle
| Command | Details |
|---|
virsh list | List running VMs |
virsh list --all | List all VMs (including stopped) |
virsh list --autostart | List VMs set to autostart |
virsh start <vm-name> | Start a VM |
virsh shutdown <vm-name> | Shutdown (graceful — sends ACPI signal) |
virsh destroy <vm-name> | Force stop (like pulling the power) |
virsh destroy <vm-name> --graceful | Force stop without resorting to SIGKILL (returns error if guest doesn’t stop) |
virsh reboot <vm-name> | Reboot |
virsh suspend <vm-name> | Suspend (pause in memory) |
virsh resume <vm-name> | Resume from suspend |
virsh save <vm-name> /path/to/save-file | Save VM state to file (hibernate) |
virsh restore /path/to/save-file | Restore VM from saved state |
virsh reset <vm-name> | Reset (hard reset, no graceful shutdown) |
virsh shutdown <vm-name> --mode acpi | Send ACPI shutdown signal |
virsh domrename <old-name> <new-name> | Rename a VM (must be off) |
VM Creation
# Create VM from ISO
virt-install \
    --name myvm \
    --ram 2048 \
    --vcpus 2 \
    --disk path=/var/lib/libvirt/images/myvm.qcow2,size=20 \
    --os-variant ubuntu22.04 \
    --network bridge=br0 \
    --graphics vnc,listen=0.0.0.0 \
    --cdrom /path/to/installer.iso

# Create VM with default NAT network
virt-install \
    --name myvm \
    --ram 2048 \
    --vcpus 2 \
    --disk path=/var/lib/libvirt/images/myvm.qcow2,size=20 \
    --os-variant rocky9.0 \
    --network network=default \
    --graphics spice \
    --cdrom /path/to/installer.iso

# Headless VM (serial console, no graphics)
virt-install \
    --name headless \
    --ram 1024 \
    --vcpus 1 \
    --disk path=/var/lib/libvirt/images/headless.qcow2,size=10 \
    --os-variant generic \
    --network network=default \
    --graphics none \
    --extra-args='console=ttyS0,115200n8 serial' \
    --location /path/to/installer.iso

# Import existing disk image (no install)
virt-install \
    --name imported \
    --ram 2048 \
    --vcpus 2 \
    --disk path=/var/lib/libvirt/images/existing.qcow2 \
    --os-variant generic \
    --network network=default \
    --import \
    --graphics vnc

# Create VM with multiple disks
virt-install \
    --name multi-disk \
    --ram 4096 \
    --vcpus 4 \
    --disk path=/var/lib/libvirt/images/root.qcow2,size=30 \
    --disk path=/var/lib/libvirt/images/data.qcow2,size=100 \
    --os-variant rocky9.0 \
    --network network=default \
    --cdrom /path/to/installer.iso

# Create VM with cloud-init (NoCloud datasource)
virt-install \
    --name cloud-vm \
    --ram 2048 \
    --vcpus 2 \
    --disk path=/var/lib/libvirt/images/cloud.qcow2 \
    --os-variant ubuntu22.04 \
    --network network=default \
    --cloud-init user-data=/path/to/user-data.yaml \
    --import

# List available OS variants
osinfo-query os
osinfo-query os | grep -i ubuntu
osinfo-query os | grep -i rhel
osinfo-query os | grep -i rocky
Quick Start from a Cloud Image
The fastest way to a working VM: no installer, cloud-init configures it on first boot.
cd /var/lib/libvirt/images

# Download a cloud image once, as the base for all VMs
# (Rocky: https://dl.rockylinux.org/pub/rocky/9/images/x86_64/Rocky-9-GenericCloud-Base.latest.x86_64.qcow2)
sudo curl -LO https://cloud-images.ubuntu.com/noble/current/noble-server-cloudimg-amd64.img

# Per VM: a 20 GB overlay on top of the base (the base itself is never written to)
sudo qemu-img create -f qcow2 -b noble-server-cloudimg-amd64.img -F qcow2 vm01.qcow2 20G

# Create and boot the VM
virt-install \
    --name vm01 \
    --memory 4096 \
    --vcpus 2 \
    --disk path=/var/lib/libvirt/images/vm01.qcow2 \
    --os-variant ubuntu24.04 \
    --network network=default \
    --cloud-init user-data=user-data.yaml \
    --import \
    --noautoconsole
user-data.yaml:
#cloud-config
hostname: vm01
users:
  - name: admin
    sudo: ALL=(ALL) NOPASSWD:ALL
    shell: /bin/bash
    ssh_authorized_keys:
      - ssh-ed25519 AAAA... you@laptop
Then virsh domifaddr vm01 shows its IP and ssh admin@<ip> logs in.
VM Deletion
| Command | Details |
|---|
virsh undefine <vm-name> | Undefine (remove VM definition, keep disk) |
virsh undefine <vm-name> --remove-all-storage | Undefine and remove all storage |
virsh undefine <vm-name> --nvram | Undefine with NVRAM (UEFI VMs) |
virsh undefine <vm-name> --snapshots-metadata | Undefine with snapshots |
| Command | Details |
|---|
virsh dominfo <vm-name> | Detailed VM info |
virsh dumpxml <vm-name> | VM XML configuration |
virsh domiflist <vm-name> | VM network interfaces |
virsh domifaddr <vm-name> | VM IP address (DHCP leases of the libvirt network; --source agent asks the guest agent) |
virsh dommemstat <vm-name> | VM memory stats |
virsh cpu-stats <vm-name> | VM CPU stats |
virsh domstate <vm-name> | VM state |
virsh domid <vm-name> | VM ID |
virsh domuuid <vm-name> | VM UUID |
virsh domdisplay <vm-name> | Display URI (VNC or SPICE) |
VM Configuration
| Command | Details |
|---|
virsh edit <vm-name> | Edit VM XML (opens in $EDITOR) |
EDITOR=nano virsh edit <vm-name> | Edit with a specific editor |
virsh define /etc/libvirt/qemu/vm01.xml | Define a VM from XML file |
virsh autostart <vm-name> | Set autostart (start on host boot) |
virsh autostart --disable <vm-name> | Disable autostart |
virsh desc <vm-name> --title "My Web Server"
virsh desc <vm-name> "Production web server running nginx" | Change VM title/description |
Memory and vCPUs: see CPU and Memory below
virt-xml (Edit a VM Without Touching XML)
Installed with virt-install. Changes are persistent and apply on the next boot.
# Memory (MiB) and vCPUs
virt-xml <vm-name> --edit --memory memory=4096,currentMemory=4096
virt-xml <vm-name> --edit --vcpus 4

# Add a new 20 GB disk, or a NIC on the default network
virt-xml <vm-name> --add-device --disk size=20
virt-xml <vm-name> --add-device --network network=default,model=virtio

# Preview a change as a diff, without applying it
virt-xml <vm-name> --edit --vcpus 4 --print-diff

# Also apply it to the running VM, where hot-plug is supported
virt-xml <vm-name> --add-device --disk size=20 --update
Console and Display
| Command | Details |
|---|
virsh console <vm-name> | Serial console (text-based access). Exit with: Ctrl+] or Ctrl+5 |
virsh vncdisplay <vm-name> | VNC display port (:0 means port 5900, :1 means 5901, etc.) |
virsh dumpxml <vm-name> | grep vnc | Find VNC port from XML |
virt-viewer <vm-name> | Open graphical console (requires virt-viewer) |
virt-viewer -c qemu+ssh://user@host/system <vm-name> | Open graphical console with remote host |
Snapshots
| Command | Details |
|---|
virsh snapshot-create <vm-name> | Create snapshot (auto-generated name with timestamp) |
virsh snapshot-create-as <vm-name> --name "before-upgrade" --description "Pre-upgrade state" | Create snapshot with specific name |
virsh snapshot-create-as <vm-name> --name "running-snap" | Snapshot of a running VM (an internal snapshot already includes memory) |
virsh snapshot-create-as <vm-name> --name "live-snap" --live --memspec file=/var/lib/libvirt/images/live-snap.mem,snapshot=external | Live external snapshot (guest keeps running; --live needs an external --memspec) |
virsh snapshot-list <vm-name> | List snapshots |
virsh snapshot-info <vm-name> --snapshotname "before-upgrade" | Show snapshot info |
virsh snapshot-dumpxml <vm-name> --snapshotname "before-upgrade" | Show snapshot XML |
virsh snapshot-current <vm-name> | Show current snapshot |
virsh snapshot-revert <vm-name> --snapshotname "before-upgrade" | Revert to snapshot |
virsh snapshot-revert <vm-name> --snapshotname "before-upgrade" --running | Revert and start (if VM was running when snapped) |
virsh snapshot-delete <vm-name> --snapshotname "before-upgrade" | Delete snapshot |
virsh snapshot-list <vm-name> --name | xargs -I{} virsh snapshot-delete <vm-name> --snapshotname {} | Delete all snapshots |
UEFI VMs: internal snapshots (the default, without --disk-only) need the NVRAM file in qcow2 format. With a raw NVRAM file libvirt refuses: internal snapshots of a VM with pflash based firmware require QCOW2 nvram format. Check with virsh dumpxml <vm-name> | grep nvram; otherwise use external snapshots (--disk-only).
Cloning
# Clone a VM (must be shut down)
virt-clone --original <source-vm> --name <new-vm> --auto-clone

# Clone with specific disk path
virt-clone --original <source-vm> --name <new-vm> \
    --file /var/lib/libvirt/images/new-vm.qcow2

# Clone with multiple disks
virt-clone --original <source-vm> --name <new-vm> \
    --file /var/lib/libvirt/images/new-root.qcow2 \
    --file /var/lib/libvirt/images/new-data.qcow2

# Before the clone's first boot: reset machine-id, SSH host keys, MAC config, DHCP leases, ...
virt-sysprep -d <new-vm>

# Only selected operations, and set a new hostname
virt-sysprep -d <new-vm> --operations machine-id,ssh-hostkeys,net-hwaddr,dhcp-client-state --hostname <new-vm>
A clone made with virt-clone keeps the source’s machine-id, SSH host keys and hostname, which leads to duplicate DHCP leases and SSH host key warnings. Run virt-sysprep on it while it is shut off. virt-sysprep --list-operations shows everything it can reset.
Disk Management
| Command | Details |
|---|
virsh domblklist <vm-name> | List VM disks |
qemu-img create -f qcow2 /var/lib/libvirt/images/new-disk.qcow2 50G | Create a new disk image |
qemu-img create -f qcow2 -o preallocation=metadata /var/lib/libvirt/images/disk.qcow2 100G | Create disk with preallocation |
qemu-img info /var/lib/libvirt/images/myvm.qcow2 | Disk image info |
qemu-img resize /var/lib/libvirt/images/myvm.qcow2 +20G | Resize disk image (increase only) |
virsh blockresize <vm-name> /var/lib/libvirt/images/myvm.qcow2 20G | Online block resize (VM must be running) |
qemu-img convert -f raw -O qcow2 input.img output.qcow2 | Convert format (raw to qcow2) |
qemu-img convert -f qcow2 -O raw input.qcow2 output.img | Convert format (qcow2 to raw) |
qemu-img convert -O qcow2 -c input.qcow2 compressed.qcow2 | Compress qcow2 image |
virsh attach-disk <vm-name> /var/lib/libvirt/images/extra.qcow2 vdb --driver qemu --subdriver qcow2 --persistent | Attach disk to running VM (hot-plug) |
virsh detach-disk <vm-name> vdb --persistent | Detach disk |
virsh detach-disk --domain <vm-name> --persistent --live --target vdb | Detach disk (live + persistent) |
virsh attach-device <vm-name> disk.xml --persistent | Attach disk via XML |
qemu-img check /var/lib/libvirt/images/myvm.qcow2 | Check disk for errors |
Network Management
Default NAT Network
| Command | Details |
|---|
virsh net-list --all | List networks |
virsh net-start default | Start network |
virsh net-autostart default | Set autostart |
virsh net-destroy default | Stop network |
virsh net-info default | Network info |
virsh net-dumpxml default | Network XML config |
virsh net-edit default | Edit network |
virsh net-dhcp-leases default | DHCP leases |
Create Custom Network
# Define network from XML
cat > /tmp/my-network.xml << EOF
<network>
  <name>isolated</name>
  <bridge name="virbr1"/>
  <ip address="10.10.10.1" netmask="255.255.255.0">
    <dhcp>
      <range start="10.10.10.100" end="10.10.10.200"/>
    </dhcp>
  </ip>
</network>
EOF

virsh net-define /tmp/my-network.xml
virsh net-start isolated
virsh net-autostart isolated
VM Network Interfaces
| Command | Details |
|---|
virsh attach-interface <vm-name> --type network --source default --model virtio --persistent | Attach new NIC |
virsh attach-interface <vm-name> --type bridge --source br0 --model virtio --persistent | Attach NIC to bridge |
virsh detach-interface <vm-name> --type network --mac 52:54:00:xx:xx:xx --persistent | Detach NIC |
# Change NIC network
virsh domiflist <vm-name>
virsh detach-interface <vm-name> --type network --mac <mac-addr> --persistent
virsh attach-interface <vm-name> --type network --source new-network --model virtio --persistent
Storage Pools
| Command | Details |
|---|
virsh pool-list --all | List pools |
virsh pool-info default | Pool info |
virsh pool-dumpxml default | Pool XML |
virsh pool-start <pool-name> | Start pool |
virsh pool-autostart <pool-name> | Autostart pool |
virsh pool-destroy <pool-name> | Stop pool |
virsh pool-refresh <pool-name> | Refresh pool (scan for new volumes) |
virsh pool-destroy <pool-name>
virsh pool-undefine <pool-name> | Delete pool |
# Create directory-based pool
virsh pool-define-as mypool dir - - - - /data/vms
virsh pool-build mypool
virsh pool-start mypool
virsh pool-autostart mypool

# Delete and recreate default pool
virsh pool-destroy default
virsh pool-undefine default
virsh pool-define-as --name default --type dir --target /new-path
virsh pool-autostart default
virsh pool-start default
Storage Volumes
| Command | Details |
|---|
virsh vol-list <pool-name> | List volumes in a pool |
virsh vol-info <vol-name> --pool <pool-name> | Volume info |
virsh vol-create-as <pool-name> new-disk.qcow2 20G --format qcow2 | Create volume |
virsh vol-delete <vol-name> --pool <pool-name> | Delete volume |
virsh vol-resize <vol-name> 50G --pool <pool-name> | Resize volume |
virsh vol-upload <vol-name> /path/to/local/file --pool <pool-name> | Upload file to volume |
virsh vol-download <vol-name> /path/to/local/file --pool <pool-name> | Download volume to file |
virsh vol-clone <source-vol> <new-vol> --pool <pool-name> | Clone volume |
CPU and Memory
| Command | Details |
|---|
virsh vcpuinfo <vm-name> | View CPU info |
virsh setvcpus <vm-name> 4 --config --maximum
virsh setvcpus <vm-name> 4 --config | Set vCPU count (config only, apply on next boot) |
virsh setvcpus <vm-name> 4 --live | Hot-add vCPUs (if supported) |
virsh vcpupin <vm-name> 0 2-3 | Pin vCPU to physical CPU |
virsh setmaxmem <vm-name> 8G --config
virsh setmem <vm-name> 4G --config | Set memory (config, apply on next boot) |
virsh setmem <vm-name> 4G --live | Hot-add memory (if supported by guest OS) |
virsh cpu-models x86_64 | View CPU model |
Migration
| Command | Details |
|---|
virsh migrate --live <vm-name> qemu+ssh://dest-host/system | Live migrate (shared storage required) |
virsh migrate --live --bandwidth 100 <vm-name> qemu+ssh://dest-host/system | Live migrate with specific bandwidth (MiB/s) |
virsh migrate --offline --persistent <vm-name> qemu+ssh://dest-host/system | Offline migrate (moves the definition only, no disks) |
virsh migrate --live --copy-storage-all <vm-name> qemu+ssh://dest-host/system | Migrate with disk copy (no shared storage) |
virsh domjobinfo <vm-name> | Check migration progress |
virsh domjobabort <vm-name> | Cancel migration |
Guest Agent
| Command | Details |
|---|
virsh qemu-agent-command <vm-name> '{"execute":"guest-info"}' 2>/dev/null && echo "Agent running" || echo "Agent not running" | Check if guest agent is running |
virsh domifaddr <vm-name> --source agent | Get IP via guest agent |
virsh domfsfreeze <vm-name> | Freeze filesystems (for consistent backup) |
virsh domfsthaw <vm-name> | Thaw filesystems |
virsh domfsinfo <vm-name> | Get filesystem info |
virsh domfstrim <vm-name> | Trim/discard unused blocks |
virsh qemu-agent-command <vm-name> '{"execute":"guest-exec","arguments":{"path":"/bin/uname","arg":["-a"]}}' | Execute command in guest (requires agent) |
Backup and Restore
# Method 1: Snapshot-based backup
virsh snapshot-create-as <vm-name> --name backup --disk-only --quiesce
cp /var/lib/libvirt/images/myvm.qcow2 /backup/myvm-backup.qcow2
virsh blockcommit <vm-name> vda --active --pivot
virsh snapshot-delete <vm-name> backup --metadata   # the snapshot no longer has its overlay
rm /var/lib/libvirt/images/myvm.backup              # the overlay file (path in snapshot-dumpxml)

# Method 2: Dump XML + copy disk (VM must be off)
virsh dumpxml <vm-name> > /backup/myvm.xml
cp /var/lib/libvirt/images/myvm.qcow2 /backup/

# Restore from backup
cp /backup/myvm.qcow2 /var/lib/libvirt/images/
virsh define /backup/myvm.xml
virsh start <vm-name>

# Method 3: Save/restore (includes RAM state)
virsh save <vm-name> /backup/myvm-state
# Restore later:
virsh restore /backup/myvm-state
Monitoring
| Command | Details |
|---|
virt-top | Live CPU/memory stats for all VMs |
virsh domblkstat <vm-name> vda | VM block stats |
virsh domifstat <vm-name> vnet0 | VM network stats |
virsh list --all --title | VM list with titles |
virsh nodeinfo | Node (host) info |
virsh nodememstats | Node memory stats |
virsh nodecpustats | Node CPU stats |
# All VM memory stats
for vm in $(virsh list --name); do echo "=== $vm ==="; virsh dommemstat $vm; done
Bulk Operations
# Start all stopped VMs
virsh list --inactive --name | xargs -I{} virsh start {}

# Shutdown all running VMs
virsh list --name | xargs -I{} virsh shutdown {}

# Force stop all running VMs
virsh list --name | xargs -I{} virsh destroy {}

# Set autostart on all VMs
virsh list --all --name | xargs -I{} virsh autostart {}

# Running VMs sorted by memory (balloon "actual" size, MB)
for vm in $(virsh list --name); do
    echo "$(virsh dommemstat "$vm" | awk '/^actual/{print int($2/1024)}') MB  $vm"
done | sort -rn

# Snapshot all running VMs
for vm in $(virsh list --name); do
    virsh snapshot-create-as "$vm" --name "bulk-$(date +%Y%m%d)" --description "Scheduled backup"
done
Remote Management
| Command | Details |
|---|
virsh -c qemu+ssh://user@remote-host/system list --all | Connect to remote host |
export LIBVIRT_DEFAULT_URI="qemu+ssh://user@remote-host/system" | Set default connection URI |
virt-viewer -c qemu+ssh://user@remote-host/system <vm-name> | Remote console |
# Copy VM to remote host (offline)
virsh dumpxml <vm-name> > vm.xml
scp vm.xml user@remote:/tmp/
scp /var/lib/libvirt/images/myvm.qcow2 user@remote:/var/lib/libvirt/images/
ssh user@remote "virsh define /tmp/vm.xml"
Useful Commands
# List all VM IPs (requires guest agent)
for vm in $(virsh list --name); do
    ip=$(virsh domifaddr "$vm" --source agent 2>/dev/null | awk '/ipv4/{print $4}' | cut -d/ -f1)
    echo "$vm: ${ip:-N/A}"
done

# Find which VM uses a disk image
virsh list --all --name | while read vm; do
    [ -n "$vm" ] && virsh domblklist "$vm" 2>/dev/null | grep -q "/path/to/disk" && echo "$vm"
done

# Get total resources used by all VMs
echo "Total vCPUs: $(virsh list --name | xargs -I{} virsh vcpucount {} --current 2>/dev/null | paste -sd+ | bc)"
echo "VMs running: $(virsh list --name | wc -l)"

# Export a VM (disks + libvirt XML) with virt-v2v; there is no OVA output (-of is raw or qcow2)
virsh shutdown <vm-name>   # wait until it is shut off
virt-v2v -i libvirt <vm-name> -o local -os /tmp/export -of qcow2

# Check QEMU version
qemu-system-x86_64 --version

# Check libvirt version
virsh version

# View host capabilities
virsh capabilities | head -50
Access VM disk contents without booting the VM:
| Command | Details |
|---|
virt-ls -l -d <vm-name> /etc | List files in a VM |
virt-cat -d <vm-name> /etc/fstab | Display a file from a VM |
virt-edit -d <vm-name> /etc/fstab | Edit a file in a VM (VM must be shut down) |
virt-df -h -d <vm-name> | Display disk usage |
virt-filesystems -l -h -d <vm-name> | List filesystems |
virt-filesystems -l -h --partitions -d <vm-name> | List partitions |
virt-log -d <vm-name> | less | Display log messages |
Important Files and Directories
| Path | Description |
|---|
/var/lib/libvirt/images/ | Default VM disk images location |
/etc/libvirt/qemu/ | VM XML configuration files |
/var/log/libvirt/qemu/ | Per-VM log files (<domain>.log) |
$HOME/.cache/virt-manager/virt-install.log | virt-install tool log |
$HOME/.cache/virt-manager/virt-manager.log | virt-manager GUI log |
/etc/libvirt/libvirtd.conf | libvirt daemon configuration |
/etc/libvirt/qemu.conf | QEMU driver configuration |
/var/run/libvirt/ | Runtime files (sockets, PID files) |
Recipes
Delete a VM Completely (Definition + Disk)
virsh shutdown vm01   # returns at once: wait until 'virsh domstate vm01' says shut off
virsh undefine vm01
virsh vol-delete --pool default vm01.qcow2
Increase Memory (e.g., 1 GB → 2 GB)
virsh dominfo vm01
virsh shutdown vm01   # wait until shut off
# Give a unit: a plain number is KiB, so "2048" would mean 2 MiB
virsh setmaxmem vm01 2G --config
virsh setmem vm01 2G --config
virsh dominfo vm01
virsh start vm01
Increase CPUs (e.g., 1 → 2)
virsh dominfo vm01
virsh shutdown vm01   # wait until shut off
virsh setvcpus --domain vm01 --maximum 2 --config
virsh setvcpus --domain vm01 --count 2 --config
virsh dominfo vm01
virsh start vm01
Clone a VM
virsh shutdown vm01   # wait until shut off
virt-clone --original vm01 --name vm01-clone --file /var/lib/libvirt/images/vm01-clone.qcow2
virt-sysprep -d vm01-clone --hostname vm01-clone
Shutdown All Running VMs
for i in $(virsh list | grep running | awk '{print $2}'); do
    virsh shutdown $i
done
Add a New Disk to a Running VM
qemu-img create -f qcow2 /var/lib/libvirt/images/vm01-data.qcow2 50G
virsh attach-disk vm01 /var/lib/libvirt/images/vm01-data.qcow2 vdb \
    --driver qemu --subdriver qcow2 --persistent
Migrate VM XML to Another Host
virsh dumpxml vm01 > vm01.xml
scp vm01.xml user@new-host:/tmp/
scp /var/lib/libvirt/images/vm01.qcow2 user@new-host:/var/lib/libvirt/images/
ssh user@new-host "virsh define /tmp/vm01.xml && virsh start vm01"
Notes
virsh destroy does an ungraceful immediate power-off — can corrupt guest filesystems. Use virsh shutdown for graceful stops. The --graceful flag avoids SIGKILL if the guest doesn’t stop in a reasonable timeout (returns an error instead of forcing).virsh undefine removes the XML configuration. If the VM is running, it becomes a transient domain and the config is removed when it stops. Disk images are NOT deleted unless --remove-all-storage is used.- VM XML files live in
/etc/libvirt/qemu/ — never edit them directly. Use virsh edit instead. - The guest agent (
qemu-guest-agent) must be installed inside the VM for domifaddr --source agent, domfsfreeze, and other guest-aware commands to work.
Advanced CPU, NUMA, and Hugepages
CPU Pinning (Emulator and IOThreads)
| Command | Details |
|---|
virsh emulatorpin <vm-name> 0-1 | Pin emulator threads to specific CPUs |
virsh iothreadpin <vm-name> 1 4 | Pin IOThread to specific CPU |
virsh setvcpu <vm-name> 3 --enable --config
virsh setvcpu <vm-name> 3 --disable --config | Enable/disable individual vCPUs |
Hugepages (Host)
# Allocate 2MB hugepages
echo 4096 | sudo tee /proc/sys/vm/nr_hugepages

# Verify
cat /proc/meminfo | grep Huge

# Make persistent (add to /etc/sysctl.conf)
echo "vm.nr_hugepages = 4096" | sudo tee -a /etc/sysctl.conf
Hugepages XML
<memoryBacking>
  <hugepages>
    <page size="2048" unit="KiB"/>
  </hugepages>
  <locked/>
</memoryBacking>
CPU Passthrough XML
<cpu mode="host-passthrough">
  <!-- topoext exists only on AMD CPUs -->
  <feature policy="require" name="topoext"/>
</cpu>
<cputune>
  <vcpupin vcpu="0" cpuset="2-3"/>
  <emulatorpin cpuset="0-1"/>
  <iothreadpin iothread="1" cpuset="4"/>
</cputune>
Block Jobs and Backups
Live Block Commit/Copy
| Command | Details |
|---|
virsh blockcommit <vm-name> vda --active --pivot --verbose | Commit overlay into base (flatten chain) |
virsh blockcopy <vm-name> vda /path/target.qcow2 --wait --verbose --pivot | Live block copy (mirror disk to new location) |
virsh blockjob <vm-name> vda --info | Check block job status |
Backing Images (Overlays)
| Command | Details |
|---|
qemu-img create -f qcow2 -b base.qcow2 -F qcow2 overlay.qcow2 | Create an overlay (delta on top of base image) |
qemu-img commit overlay.qcow2 | Merge overlay back into base |
qemu-img info --backing-chain overlay.qcow2 | Show full backing chain |
Dirty Bitmaps (Incremental Backup)
# Full backup that also creates checkpoint cp1 (the start point for incremental backups)
virsh backup-begin <vm-name> --checkpointxml checkpoint.xml

# Later: incremental backup of everything changed since cp1
virsh backup-begin <vm-name> backup.xml

# Progress, or cancel (a push-mode backup ends on its own when done)
virsh domjobinfo <vm-name>
virsh domjobabort <vm-name>

# List checkpoints
virsh checkpoint-list <vm-name>
checkpoint.xml and backup.xml:
<domaincheckpoint>
  <name>cp1</name>
</domaincheckpoint>

<domainbackup>
  <incremental>cp1</incremental>
  <disks>
    <disk name="vda" backup="yes" type="file">
      <target file="/backup/vda-inc.qcow2"/>
      <driver type="qcow2"/>
    </disk>
  </disks>
</domainbackup>
Export Disk via NBD
# Load the nbd module, then connect the disk image as a block device
sudo modprobe nbd max_part=8
sudo qemu-nbd --connect=/dev/nbd0 disk.qcow2

# Access with guestfish
guestfish --ro -a /dev/nbd0 -i

# Disconnect
sudo qemu-nbd --disconnect /dev/nbd0
PCI Passthrough (VFIO)
Enable IOMMU (Host Kernel Cmdline)
Add to /etc/default/grub (GRUB_CMDLINE_LINUX):
# Intel
intel_iommu=on iommu=pt

# AMD
amd_iommu=on iommu=pt
Then regenerate the GRUB config and reboot: grub2-mkconfig -o /boot/grub2/grub.cfg on RHEL/Fedora, sudo update-grub on Debian/Ubuntu.
Bind Device to vfio-pci
# Find the device and its [vendor:device] ID, e.g. [10de:1eb8]
lspci -nn | grep -i nvidia  # or your device

# Load vfio-pci and unbind the device from its current driver
sudo modprobe vfio-pci
echo "0000:3b:00.0" | sudo tee /sys/bus/pci/devices/0000:3b:00.0/driver/unbind

# Bind to vfio-pci, using the vendor and device ID from lspci
echo "10de 1eb8" | sudo tee /sys/bus/pci/drivers/vfio-pci/new_id
Attach PCI Device to VM
# List PCI devices
virsh nodedev-list | grep pci

# Detach from host
virsh nodedev-detach pci_0000_3b_00_0

# Attach to VM (via XML)
virsh attach-device <vm-name> pci-device.xml --live
VFIO Device XML
<hostdev mode="subsystem" type="pci" managed="yes">
  <source>
    <address domain="0x0000" bus="0x3b" slot="0x00" function="0x0"/>
  </source>
</hostdev>
SR-IOV
# Create Virtual Functions
echo 4 | sudo tee /sys/class/net/enp3s0f0/device/sriov_numvfs

# Verify VFs created
lspci | grep "Virtual Function"
ip link show enp3s0f0
Advanced Networking
macvtap (Direct Physical Interface Access)
# Attach macvtap interface (guest gets own MAC on physical network)
virsh attach-interface <vm-name> --type direct --source eth0 --model virtio --live
Note: With macvtap, the guest can communicate with the external network but NOT with the host.
Open vSwitch
# Create OVS bridge
ovs-vsctl add-br ovsbr0
ovs-vsctl add-port ovsbr0 enp3s0

# Define libvirt network using OVS (ovs-network.xml)
virsh net-define ovs-network.xml
virsh net-start ovs
virsh net-autostart ovs
Interface Tuning
| Command | Details |
|---|
virsh domif-setlink <vm-name> vnet0 up | Set link state |
virsh domiftune <vm-name> vnet0 --inbound 1000 --outbound 1000 | Set bandwidth limits (KiB/s) |
virsh domif-getlink <vm-name> vnet0 | Check link state |
I/O Tuning
| Command | Details |
|---|
virsh blkiotune <vm-name> --weight 800 | Set block I/O weight (100-1000) |
virsh domblkerror <vm-name> | Check domain block errors |
Recommended Settings
- Use
virtio bus for disks and network (not IDE/e1000) - Use
cache=none with aio=native for best I/O - Enable multi-queue virtio-net for high network throughput
- Use
virtio-scsi with iothreads for multiple disks - Enable vhost-net for network acceleration
UEFI Boot (OVMF)
virt-install \
    --name vm-uefi \
    --ram 4096 \
    --vcpus 4 \
    --os-variant rocky9.0 \
    --cpu host-passthrough \
    --machine q35 \
    --boot uefi \
    --disk size=40,format=qcow2,bus=virtio \
    --cdrom /path/to/installer.iso \
    --network network=default,model=virtio
Cloud-Init Seed ISO
# Create seed ISO for cloud images
cloud-localds seed.iso user-data meta-data

# Attach to VM before it boots (CD-ROM hot-plug isn't supported on SATA/IDE)
virsh attach-disk <vm-name> /var/lib/libvirt/images/seed.iso sdb --type cdrom --config
virtiofs (Shared Filesystem)
XML Configuration
virtiofs needs shared guest memory, so the domain also needs a <memoryBacking> block:
<memoryBacking>
  <source type="memfd"/>
  <access mode="shared"/>
</memoryBacking>

<filesystem type="mount" accessmode="passthrough">
  <source dir="/srv/share"/>
  <target dir="shared"/>
  <driver type="virtiofs"/>
</filesystem>
Mount Inside Guest
mount -t virtiofs shared /mnt
Live Migration (Advanced)
| Command | Details |
|---|
virsh migrate-setspeed <vm-name> 1024 | Set migration speed limit (MiB/s, a plain number) |
virsh migrate-setmaxdowntime <vm-name> 200 | Set maximum downtime (milliseconds) |
virsh migrate --live --persistent --unsafe <vm-name> qemu+ssh://dest/system | Live migrate with unsafe mode (skip some checks) |
Capabilities and Conversion
| Command | Details |
|---|
virsh domcapabilities | Show domain capabilities (supported features, firmwares, CPU models) |
virsh cpu-compare cpu-baseline.xml | Compare CPU features |
virsh domxml-to-native qemu-argv vm.xml | Convert libvirt XML to qemu command line |
virsh vol-path --pool default disk1.qcow2 | Get volume path from pool |
Troubleshooting (Extended)
# Check libvirtd logs
journalctl -u libvirtd --no-pager -e

# Modular daemons (RHEL 9, Fedora): the QEMU driver runs as virtqemud
journalctl -u virtqemud --no-pager -e

# Per-VM QEMU log (startup errors, crashes)
sudo tail -f /var/log/libvirt/qemu/<vm-name>.log

# Also useful: virsh domjobinfo (Migration), virsh domblkerror (I/O Tuning),
# virsh domif-getlink (Interface Tuning), virsh reset (VM Lifecycle)
qemu-system Direct Launch (No libvirt)
For edge cases where libvirt doesn’t support a feature:
sudo qemu-system-x86_64 \
    -enable-kvm \
    -cpu host \
    -smp 8,sockets=1,cores=8,threads=1 \
    -m 16G \
    -object memory-backend-file,id=mem0,size=16G,mem-path=/dev/hugepages,share=on \
    -numa node,memdev=mem0,cpus=0-7 \
    -drive if=virtio,file=disk.qcow2,cache=none,aio=native,format=qcow2 \
    -netdev tap,id=n0,ifname=tap0,script=no,downscript=no,vhost=on,queues=4 \
    -device virtio-net-pci,netdev=n0,mq=on,vectors=10,rx_queue_size=1024,tx_queue_size=1024 \
    -machine q35,accel=kvm \
    -display none \
    -serial mon:stdio

Comments