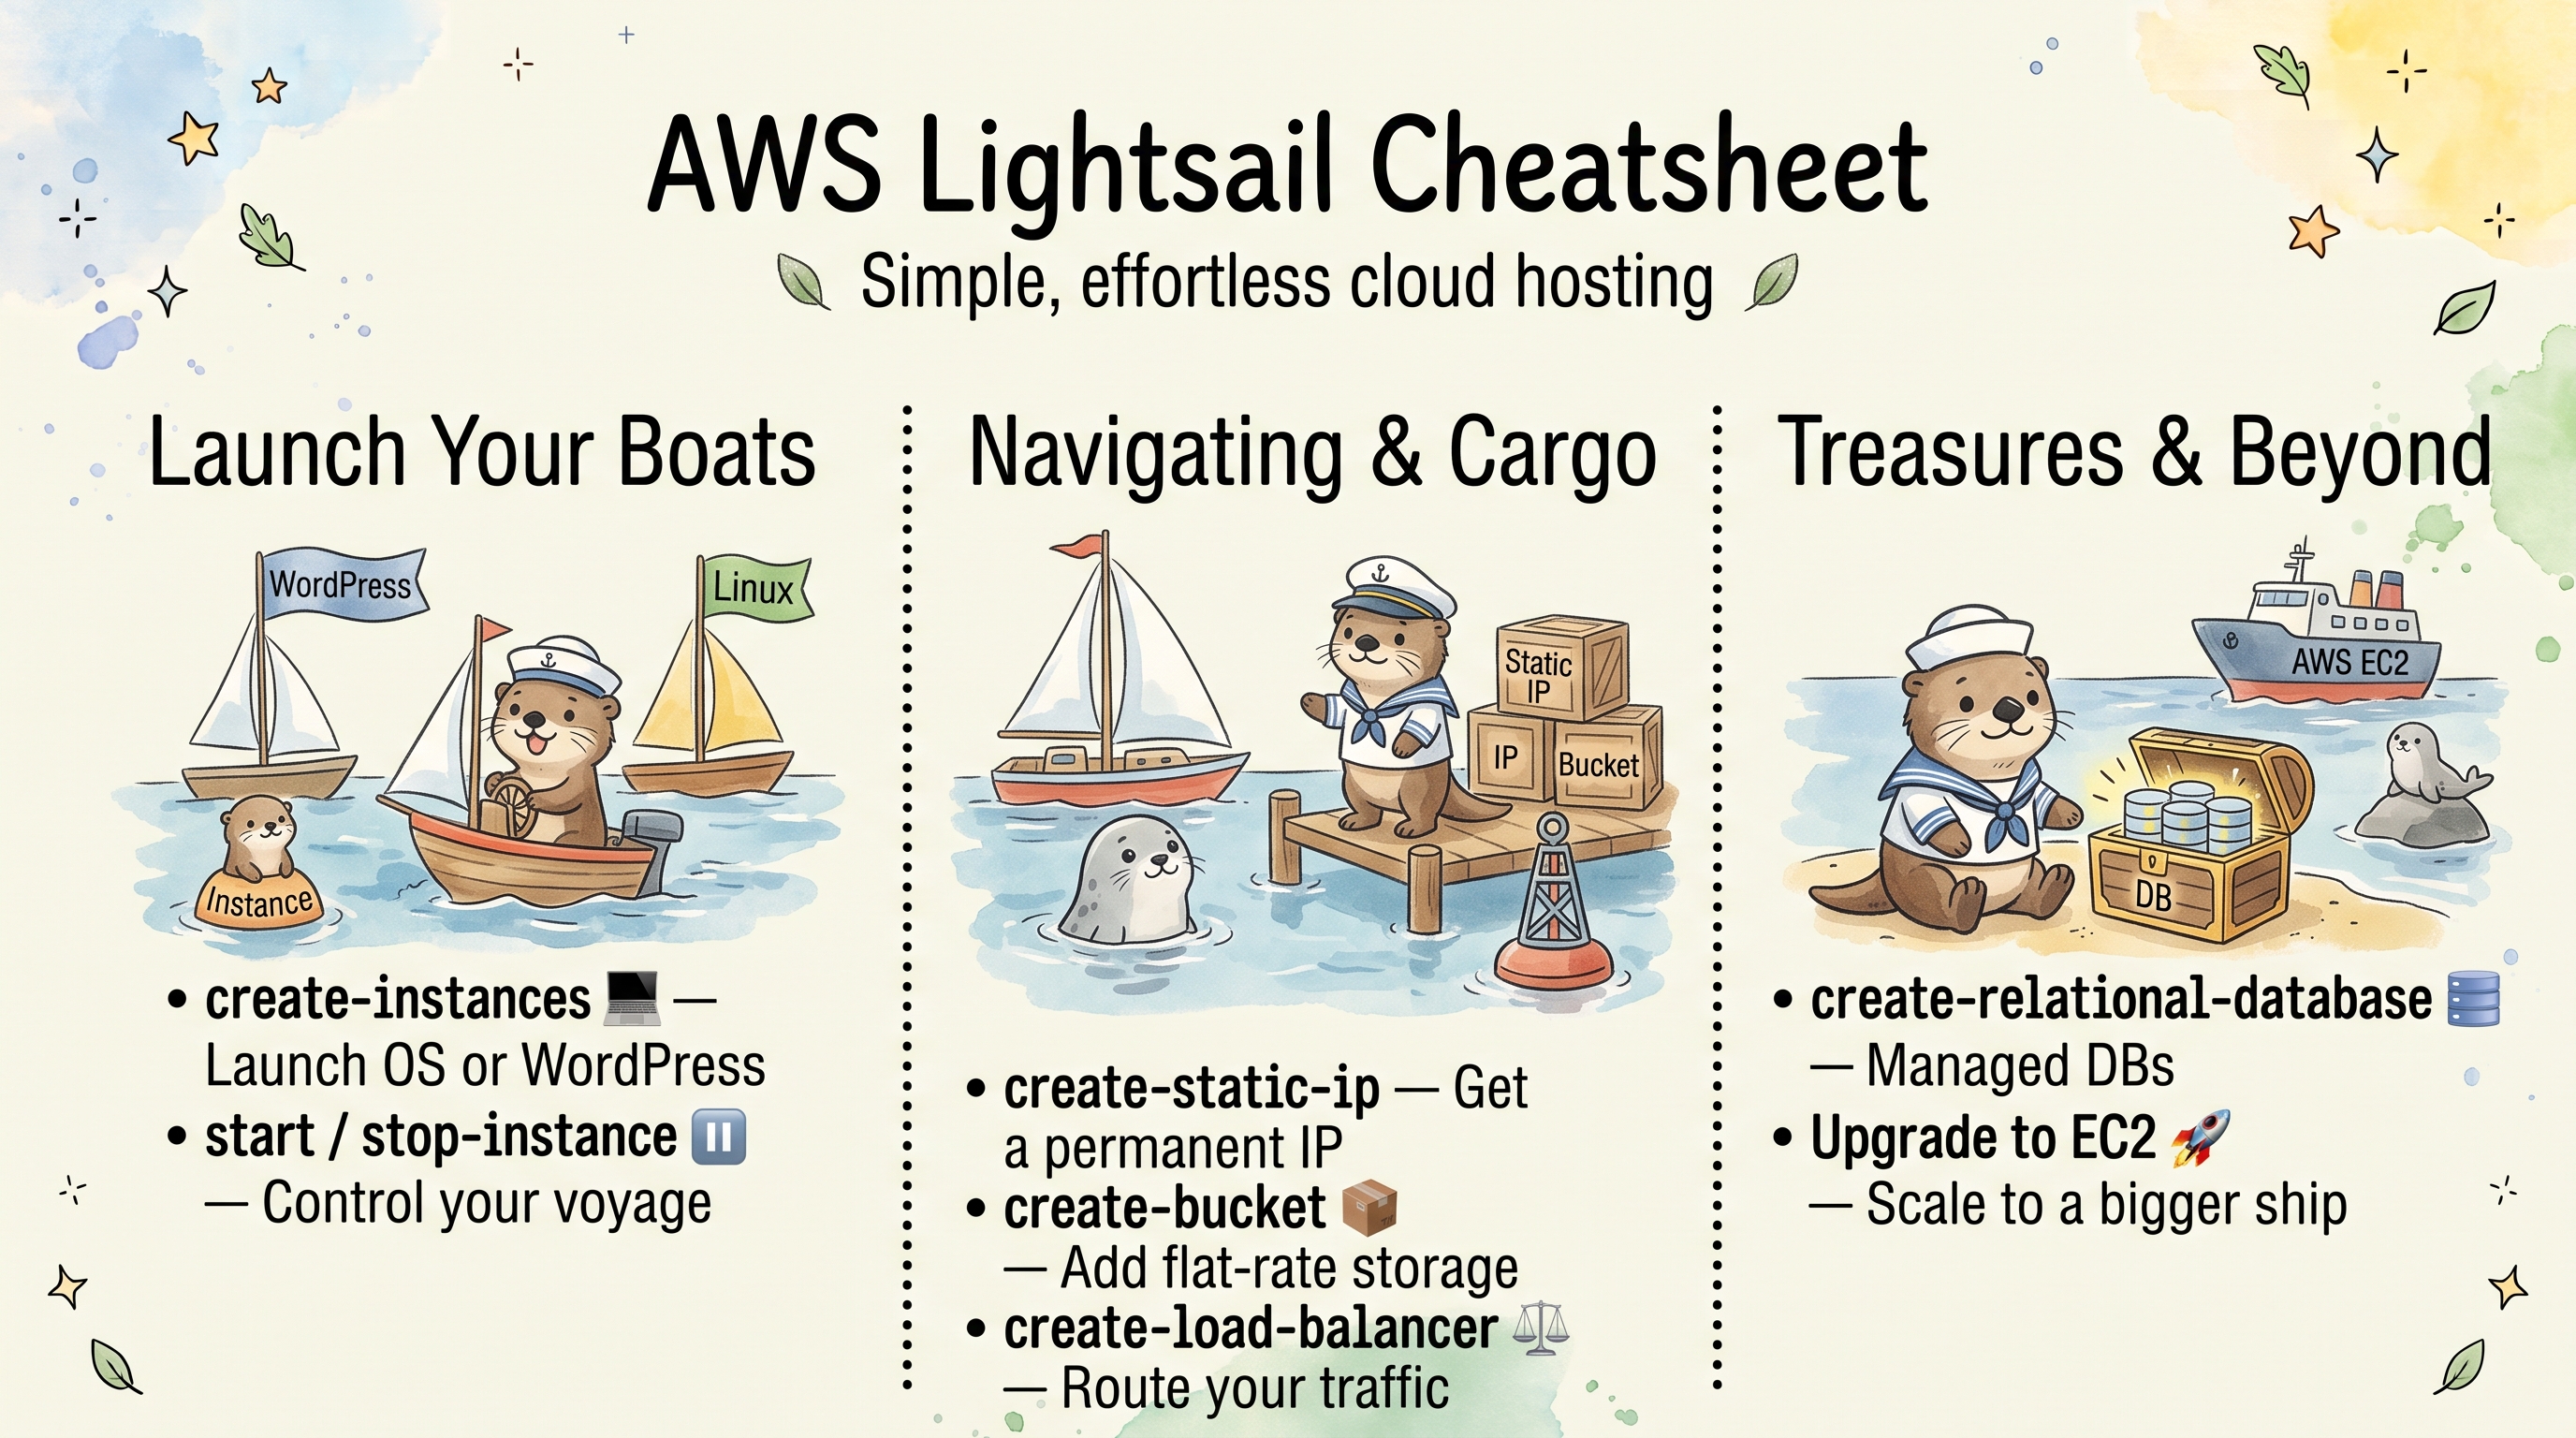
AWS Lightsail Cheatsheet
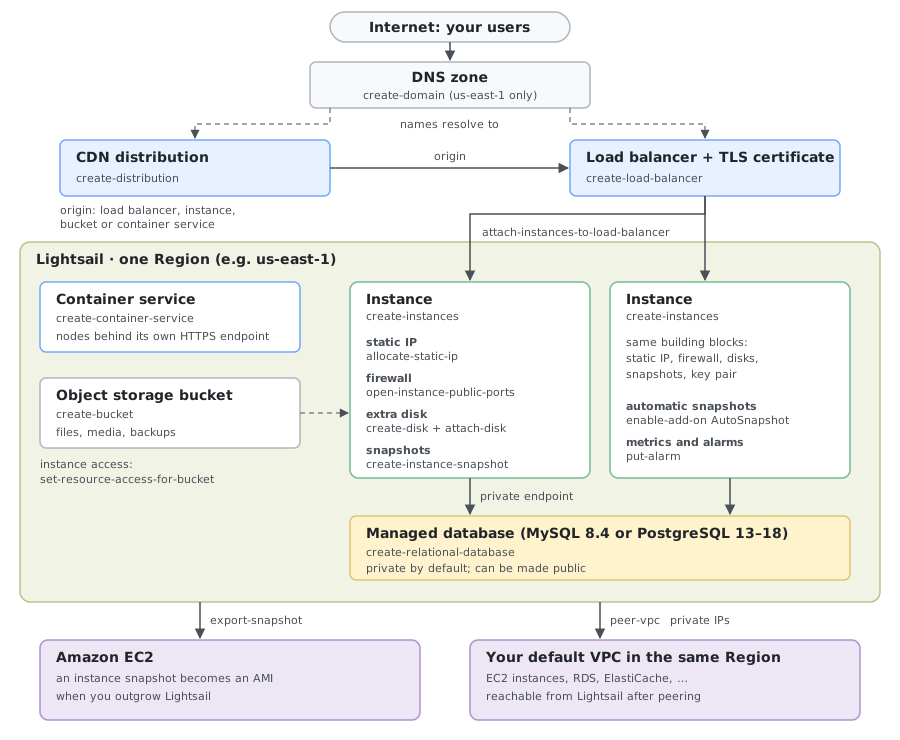
Amazon Lightsail is a simplified compute service offering virtual private servers (instances), managed databases, storage, load balancers, and CDN — all with predictable monthly pricing. Think of it as “AWS made simple” for smaller workloads.
When to Use Lightsail vs EC2
| Aspect | Lightsail | EC2 |
|---|---|---|
| Pricing | Fixed monthly (includes transfer) | Per-hour + data transfer separately |
| Complexity | Simple console, fewer options | Full AWS flexibility |
| Networking | Built-in firewall, static IPs | VPC, security groups, NACLs, ENIs |
| Use case | Blogs, small apps, dev/test, learning | Production workloads, complex architectures |
| Scaling | Limited (upgrade instance plan) | Auto Scaling, ALB, complex topologies |
| VPC peering | Yes (to full AWS VPC) | Native |
| Instance types | Predefined bundles | Hundreds of types |
Region
The examples use us-east-1 (zones us-east-1a to us-east-1f). Lightsail commands go to your CLI’s default region, so if that is another region, set it first, or a zone like us-east-1a is rejected with The given Availability Zone is invalid:
export AWS_REGION=us-east-1            # this shell only
aws configure set region us-east-1     # or change the profile's default
aws configure get region               # check
Alternatively, add --region us-east-1 to each command. Blueprint and bundle IDs can differ between regions: list them with get-blueprints and get-bundles in the region you use.
Instances
Create Instance
# List available blueprints (OS and apps)
aws lightsail get-blueprints --query 'blueprints[].{id:blueprintId,name:name,type:type}' --output table

# List available bundles (instance plans)
aws lightsail get-bundles --query 'bundles[].{id:bundleId,cpu:cpuCount,ram:ramSizeInGb,disk:diskSizeInGb,price:price}' --output table

# Create instance (nano_3_0 is the cheapest plan with a public IPv4: $5/month in us-east-1;
# nano_ipv6_3_0 is $3.50 but IPv6-only, so you need IPv6 to reach it)
aws lightsail create-instances \
  --instance-names my-instance \
  --availability-zone us-east-1a \
  --blueprint-id ubuntu_22_04 \
  --bundle-id nano_3_0 \
  --key-pair-name my-keypair

# Create instance with user-data (single quotes: in double quotes an interactive
# bash expands the ! in #!/bin/bash and fails with "event not found")
aws lightsail create-instances \
  --instance-names web-server \
  --availability-zone us-east-1a \
  --blueprint-id ubuntu_22_04 \
  --bundle-id nano_3_0 \
  --user-data '#!/bin/bash
apt update && apt install -y nginx
systemctl enable --now nginx'

# Or keep the script in a file
aws lightsail create-instances \
  --instance-names web-server \
  --availability-zone us-east-1a \
  --blueprint-id ubuntu_22_04 \
  --bundle-id nano_3_0 \
  --user-data file://user-data.sh
The script runs once as root on the first boot; its output is in /var/log/cloud-init-output.log on the instance.
Manage Instances
# List instances
aws lightsail get-instances
aws lightsail get-instances --query 'instances[].{name:name,state:state.name,ip:publicIpAddress,az:location.availabilityZone}' --output table

# Get instance details
aws lightsail get-instance --instance-name my-instance

# Start / stop / reboot
aws lightsail start-instance --instance-name my-instance
aws lightsail stop-instance --instance-name my-instance
aws lightsail reboot-instance --instance-name my-instance

# Delete instance
aws lightsail delete-instance --instance-name my-instance

# Get instance access (SSH key)
aws lightsail get-instance-access-details --instance-name my-instance
Instance Plans (Bundles)
| Plan | vCPU | RAM | SSD | Transfer | Price/month (with public IPv4) | IPv6-only |
|---|---|---|---|---|---|---|
| nano | 2 | 512 MB | 20 GB | 1 TB | $5 | $3.50 |
| micro | 2 | 1 GB | 40 GB | 2 TB | $7 | $5 |
| small | 2 | 2 GB | 60 GB | 3 TB | $12 | $10 |
| medium | 2 | 4 GB | 80 GB | 4 TB | $24 | $20 |
| large | 2 | 8 GB | 160 GB | 5 TB | $44 | $40 |
| xlarge | 4 | 16 GB | 320 GB | 6 TB | $84 | $80 |
| 2xlarge | 8 | 32 GB | 640 GB | 7 TB | $164 | $160 |
Linux prices for us-east-1 from the AWS price list (October 2026), region-dependent. Transfer is included in the monthly cost.
Static IPs
# Allocate static IP
aws lightsail allocate-static-ip --static-ip-name my-static-ip

# Attach to instance
aws lightsail attach-static-ip --static-ip-name my-static-ip --instance-name my-instance

# Detach static IP
aws lightsail detach-static-ip --static-ip-name my-static-ip

# Release static IP
aws lightsail release-static-ip --static-ip-name my-static-ip

# List static IPs
aws lightsail get-static-ips
Firewall (Networking)
# Open a port
aws lightsail open-instance-public-ports \
  --instance-name my-instance \
  --port-info fromPort=443,toPort=443,protocol=tcp

# Open port range
aws lightsail open-instance-public-ports \
  --instance-name my-instance \
  --port-info fromPort=8000,toPort=9000,protocol=tcp

# Restrict to specific IP
aws lightsail open-instance-public-ports \
  --instance-name my-instance \
  --port-info fromPort=22,toPort=22,protocol=tcp,cidrs=10.0.0.0/8

# Close a port
aws lightsail close-instance-public-ports \
  --instance-name my-instance \
  --port-info fromPort=8080,toPort=8080,protocol=tcp

# Get current firewall rules
aws lightsail get-instance-port-states --instance-name my-instance
Key Pairs
# Create key pair
aws lightsail create-key-pair --key-pair-name my-keypair
# Save the private key from the output

# Import existing key pair (ssh-rsa keys only; pass the .pub file as it is)
aws lightsail import-key-pair \
  --key-pair-name my-imported-key \
  --public-key-base64 file://~/.ssh/id_rsa.pub

# List key pairs
aws lightsail get-key-pairs

# Delete key pair
aws lightsail delete-key-pair --key-pair-name my-keypair
Snapshots
# Create instance snapshot
aws lightsail create-instance-snapshot \
  --instance-name my-instance \
  --instance-snapshot-name my-snapshot-$(date +%Y%m%d)

# List snapshots
aws lightsail get-instance-snapshots
aws lightsail get-instance-snapshots --query 'instanceSnapshots[].{name:name,state:state,created:createdAt,size:sizeInGb}' --output table

# Create instance from snapshot
aws lightsail create-instances-from-snapshot \
  --instance-names restored-instance \
  --availability-zone us-east-1a \
  --instance-snapshot-name my-snapshot-20240101 \
  --bundle-id nano_3_0

# Delete snapshot
aws lightsail delete-instance-snapshot --instance-snapshot-name my-snapshot-20240101

# Enable automatic snapshots
aws lightsail enable-add-on \
  --resource-name my-instance \
  --add-on-request "addOnType=AutoSnapshot,autoSnapshotAddOnRequest={snapshotTimeOfDay=03:00}"

# Disable automatic snapshots
aws lightsail disable-add-on --resource-name my-instance --add-on-type AutoSnapshot
Disks (Block Storage)
# Create additional disk
aws lightsail create-disk \
  --disk-name my-data-disk \
  --availability-zone us-east-1a \
  --size-in-gb 64

# Attach disk to instance
aws lightsail attach-disk \
  --disk-name my-data-disk \
  --instance-name my-instance \
  --disk-path /dev/xvdf

# Detach disk
aws lightsail detach-disk --disk-name my-data-disk

# List disks
aws lightsail get-disks

# Create disk snapshot
aws lightsail create-disk-snapshot \
  --disk-name my-data-disk \
  --disk-snapshot-name my-disk-snap-$(date +%Y%m%d)

# Delete disk
aws lightsail delete-disk --disk-name my-data-disk
Managed Databases
# Create database
aws lightsail create-relational-database \
  --relational-database-name my-db \
  --availability-zone us-east-1a \
  --relational-database-blueprint-id mysql_8_4 \
  --relational-database-bundle-id micro_2_0 \
  --master-database-name myapp \
  --master-username admin \
  --master-user-password 'SecureP@ss123'

# List databases
aws lightsail get-relational-databases

# Get connection details
aws lightsail get-relational-database --relational-database-name my-db \
  --query 'relationalDatabase.{endpoint:masterEndpoint.address,port:masterEndpoint.port,user:masterUsername}'

# Create database snapshot
aws lightsail create-relational-database-snapshot \
  --relational-database-name my-db \
  --relational-database-snapshot-name db-snap-$(date +%Y%m%d)

# Delete database
aws lightsail delete-relational-database --relational-database-name my-db
Available Database Engines
| Engine | Blueprint ID |
|---|---|
| MySQL 8.4 | mysql_8_4 |
| PostgreSQL 18 | postgres_18 |
| PostgreSQL 17 | postgres_17 |
| PostgreSQL 16 | postgres_16 |
| PostgreSQL 15 | postgres_15 |
| PostgreSQL 14 | postgres_14 |
| PostgreSQL 13 | postgres_13 |
Offered in us-east-1 in October 2026; MySQL 8.0 and 5.7 are no longer available. The list changes as engine versions reach end of support, so check it with:
aws lightsail get-relational-database-blueprints --query 'blueprints[].[blueprintId,engineVersion]' --output table
aws lightsail get-relational-database-bundles --query 'bundles[].[bundleId,ramSizeInGb,diskSizeInGb,price]' --output table
Load Balancers
# Create load balancer
aws lightsail create-load-balancer \
  --load-balancer-name my-lb \
  --instance-port 80 \
  --health-check-path /health

# Attach instance
aws lightsail attach-instances-to-load-balancer \
  --load-balancer-name my-lb \
  --instance-names my-instance-1 my-instance-2

# Detach instance
aws lightsail detach-instances-from-load-balancer \
  --load-balancer-name my-lb \
  --instance-names my-instance-1

# Get load balancer info
aws lightsail get-load-balancer --load-balancer-name my-lb

# Create TLS certificate
aws lightsail create-load-balancer-tls-certificate \
  --load-balancer-name my-lb \
  --certificate-name my-cert \
  --certificate-domain-name example.com \
  --certificate-alternative-names www.example.com

# Delete load balancer
aws lightsail delete-load-balancer --load-balancer-name my-lb
DNS (Domains)
Lightsail’s DNS commands only work in us-east-1: add --region us-east-1 or they fail.
# Create DNS zone
aws lightsail create-domain --region us-east-1 --domain-name example.com

# Create DNS records
aws lightsail create-domain-entry --region us-east-1 \
  --domain-name example.com \
  --domain-entry "name=www,type=A,target=1.2.3.4"

aws lightsail create-domain-entry --region us-east-1 \
  --domain-name example.com \
  --domain-entry "name=mail,type=MX,target=10 mail.example.com"

# List DNS records
aws lightsail get-domain --region us-east-1 --domain-name example.com

# Delete DNS record
aws lightsail delete-domain-entry --region us-east-1 \
  --domain-name example.com \
  --domain-entry "name=www,type=A,target=1.2.3.4"

# Delete DNS zone
aws lightsail delete-domain --region us-east-1 --domain-name example.com
Containers
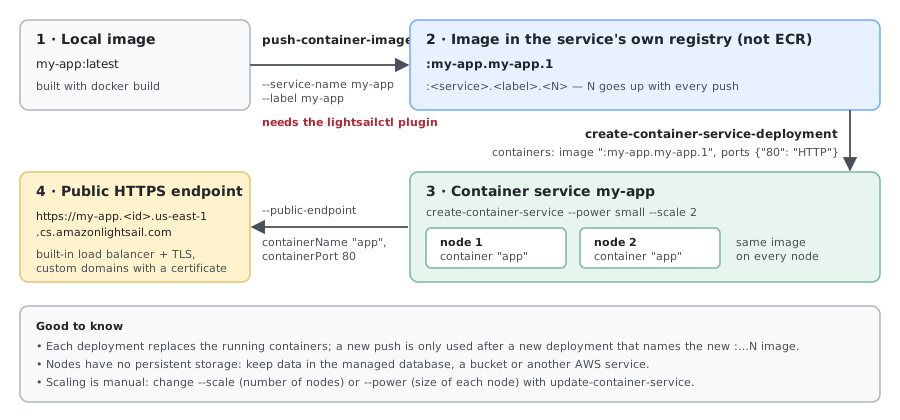
# Create container service
aws lightsail create-container-service \
  --service-name my-app \
  --power small \
  --scale 2

# Push local image to Lightsail (needs the lightsailctl plugin)
aws lightsail push-container-image \
  --service-name my-app \
  --label my-app \
  --image my-app:latest

# Deploy container
aws lightsail create-container-service-deployment \
  --service-name my-app \
  --containers '{
    "app": {
      "image": ":my-app.my-app.1",
      "ports": {"80": "HTTP"},
      "environment": {"NODE_ENV": "production"}
    }
  }' \
  --public-endpoint '{"containerName": "app", "containerPort": 80}'

# Get container service info
aws lightsail get-container-services --service-name my-app

# Delete container service
aws lightsail delete-container-service --service-name my-app
What’s Behind Lightsail Containers
Lightsail containers are managed container hosting; AWS doesn’t document or expose the infrastructure underneath:
- Each node gets the vCPU/RAM of the power you selected (
nano…xlarge) - A built-in load balancer with a public HTTPS endpoint spreads traffic across the nodes
- TLS is terminated by Lightsail (default domain, or your own certificate)
- Containers run on AWS-managed infrastructure — no visibility or access to it
- Ephemeral storage only — no persistent volumes, data lost on restart
Lightsail Containers vs ECS Fargate
| Aspect | Lightsail Containers | ECS Fargate |
|---|---|---|
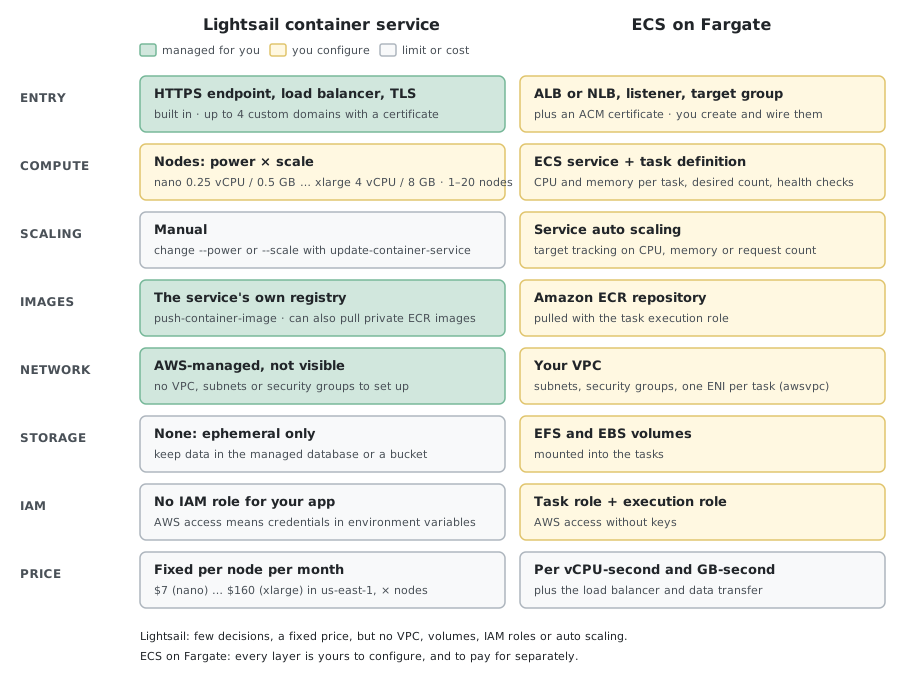
| Infrastructure | Managed by Lightsail, not exposed | Fargate tasks in your VPC |
| Load balancer | Built-in, managed | You configure ALB/NLB |
| Networking | Opaque, public only | Full VPC control |
| IAM | Simplified (no task roles) | Full IAM task roles |
| Scaling | Manual (set node count) | Auto-scaling policies |
| Persistent storage | None | EFS, EBS |
| Cost | Fixed monthly pricing | Pay per vCPU-second |
What You Don’t Get (vs ECS/EKS)
- No VPC peering or private networking
- No IAM task roles
- No service mesh or service discovery
- No access to the underlying infrastructure or ENIs
- No custom security groups
- No persistent volumes
Persistent Storage Workarounds
| Approach | Good for |
|---|---|
| Lightsail managed database (MySQL/PostgreSQL) | Relational data |
| S3 (via AWS SDK in your app) | Files, media, backups |
| DynamoDB | Key-value / NoSQL data |
Caveat: No IAM task roles means you must pass AWS credentials as environment variables (less secure than ECS task roles).
When to Move to ECS/EKS
If your workload needs persistent volumes, shared filesystems, IAM roles for service accounts, or VPC-level networking — Lightsail containers aren’t the right fit. Use ECS Fargate with EFS or EKS with PVC.
Pushing Images to AWS Registries
ECR (Elastic Container Registry)
# Authenticate Docker to ECR
aws ecr get-login-password --region us-east-1 | \
  docker login --username AWS --password-stdin 123456789012.dkr.ecr.us-east-1.amazonaws.com

# Create repository
aws ecr create-repository --repository-name my-app --region us-east-1

# Tag image
docker tag my-app:latest 123456789012.dkr.ecr.us-east-1.amazonaws.com/my-app:latest

# Push
docker push 123456789012.dkr.ecr.us-east-1.amazonaws.com/my-app:latest
Lightsail (Internal Registry)
# Pushed images go to the service's own registry, not ECR (needs the lightsailctl plugin);
# a service can also pull images from private ECR repositories
aws lightsail push-container-image \
  --service-name my-service \
  --label my-app \
  --image my-app:latest
# Returns reference like :my-service.my-app.1
Push Target Quick Reference
| Target | Auth | Push Command |
|---|---|---|
| ECR | aws ecr get-login-password | docker login ... | docker push <account>.dkr.ecr.<region>.amazonaws.com/repo:tag |
| Lightsail | None (AWS CLI creds + the lightsailctl plugin) | aws lightsail push-container-image ... |
| ECR Public | aws ecr-public get-login-password | docker login public.ecr.aws | docker push public.ecr.aws/<alias>/repo:tag |
CDN (Distributions)
# Create distribution (CDN)
aws lightsail create-distribution \
  --distribution-name my-cdn \
  --origin "name=my-instance,regionName=us-east-1,protocolPolicy=http-only" \
  --default-cache-behavior "behavior=cache" \
  --bundle-id small_1_0

# Get distribution info
aws lightsail get-distributions

# Delete distribution
aws lightsail delete-distribution --distribution-name my-cdn
Object Storage (Buckets)
# Create bucket
aws lightsail create-bucket --bucket-name my-bucket --bundle-id small_1_0

# List buckets
aws lightsail get-buckets

# Set bucket access
aws lightsail update-bucket \
  --bucket-name my-bucket \
  --access-rules "getObject=public,allowPublicOverrides=true"

# Attach bucket to instance (grants instance access)
aws lightsail set-resource-access-for-bucket \
  --resource-name my-instance \
  --bucket-name my-bucket \
  --access allow

# Delete bucket
aws lightsail delete-bucket --bucket-name my-bucket
VPC Peering (Connect to Full AWS)
# Enable VPC peering
aws lightsail peer-vpc

# Get peering status
aws lightsail is-vpc-peered
Once peered, Lightsail instances can communicate with resources in your default VPC (RDS, ElastiCache, etc.) via private IPs.
Monitoring
# Get instance metrics (GNU date on Linux; on macOS use $(date -u -v-1H +%Y-%m-%dT%H:%M:%SZ) for the start time)
aws lightsail get-instance-metric-data \
  --instance-name my-instance \
  --metric-name CPUUtilization \
  --period 300 \
  --start-time $(date -u -d '1 hour ago' +%Y-%m-%dT%H:%M:%SZ) \
  --end-time $(date -u +%Y-%m-%dT%H:%M:%SZ) \
  --unit Percent \
  --statistics Average

# Create alarm
aws lightsail put-alarm \
  --alarm-name high-cpu \
  --metric-name CPUUtilization \
  --monitored-resource-name my-instance \
  --comparison-operator GreaterThanThreshold \
  --threshold 80 \
  --evaluation-periods 2 \
  --datapoints-to-alarm 2 \
  --notification-enabled \
  --contact-protocols Email \
  --notification-triggers ALARM

# List alarms
aws lightsail get-alarms
Available Metrics
| Metric | Description |
|---|---|
CPUUtilization | CPU usage percentage |
NetworkIn | Bytes received |
NetworkOut | Bytes sent |
StatusCheckFailed | System + instance status check |
StatusCheckFailed_Instance | Instance status check |
StatusCheckFailed_System | System status check |
BurstCapacityTime | Time remaining at burst CPU |
BurstCapacityPercentage | Burst capacity remaining % |
SSH Access
# Connect via browser-based SSH (console only — opens web terminal)

# Connect via CLI (download key first)
# (privateKeyBase64 already holds the PEM text, despite its name)
aws lightsail download-default-key-pair --output text --query privateKeyBase64 > lightsail-key.pem
chmod 600 lightsail-key.pem
ssh -i lightsail-key.pem ubuntu@<public-ip>

# Or use your own key pair (specified at instance creation)
ssh -i ~/.ssh/my-keypair.pem ubuntu@<public-ip>
Troubleshooting
| Issue | Fix |
|---|---|
| Cannot SSH | Check firewall allows port 22 from your IP |
| Instance unreachable | Verify static IP is attached, check instance state |
| Disk not visible | Format and mount after attaching: mkfs.ext4 /dev/xvdf && mount |
| Database connection refused | Check database is public or use VPC peering for private access |
| Snapshot creation slow | Large disks take longer — check status with get-instance-snapshots |
| Out of transfer | Overage billed at $0.09/GB — upgrade plan or use CDN |
Cost Tips
- Lightsail includes data transfer — no surprise bandwidth bills
- Snapshots are billed at $0.05/GB/month
- Static IPs are free when attached, $0.005/hr when unattached
- Automatic snapshots retain 7 days by default
- Consider upgrading to EC2 when you need Auto Scaling, multiple AZs, or advanced networking
- Use the
export-snapshotcommand to migrate to EC2 when you outgrow Lightsail
Export to EC2
When you outgrow Lightsail, move the instance to EC2 through a snapshot. The export creates an AMI (plus an EBS snapshot of the system disk) in EC2, in the same Region as the Lightsail snapshot; the Lightsail instance keeps running until you delete it.
Step 1: Snapshot the instance
aws lightsail create-instance-snapshot \
  --instance-name my-instance \
  --instance-snapshot-name my-snapshot-20261010

# Wait until the state is "available" (pending → available)
aws lightsail get-instance-snapshot \
  --instance-snapshot-name my-snapshot-20261010 \
  --query 'instanceSnapshot.state'
Step 2: Export the snapshot to EC2
aws lightsail export-snapshot --source-snapshot-name my-snapshot-20261010
Step 3: Wait for the export record
# State goes Started → Succeeded; the AMI ID is in destinationInfo.id
aws lightsail get-export-snapshot-records \
  --query 'exportSnapshotRecords[].{record:name,source:sourceInfo.name,state:state,ami:destinationInfo.id}' \
  --output table
The record name (ExportSnapshotRecord-…) is what step 4 uses.
Step 4: Launch an EC2 instance
Either let Lightsail create it through a CloudFormation stack:
aws lightsail create-cloud-formation-stack \
  --instances "sourceName=ExportSnapshotRecord-…,instanceType=t3.small,portInfoSource=DEFAULT,availabilityZone=us-east-1a"

# Follow the stack; destinationInfo.id is the CloudFormation stack
aws lightsail get-cloud-formation-stack-records \
  --query 'cloudFormationStackRecords[].{state:state,stack:destinationInfo.id}' \
  --output table
portInfoSource sets the EC2 firewall: DEFAULT (the blueprint’s default ports), INSTANCE (copy the Lightsail instance’s firewall), NONE or CLOSED. Wait for the instance before running the command again with the same record.
Or launch it yourself from the AMI, with your own VPC, subnet and key pair:
aws ec2 run-instances \
  --image-id ami-0123456789abcdef0 \
  --instance-type t3.small \
  --key-name my-ec2-key \
  --subnet-id subnet-0123456789abcdef0
Step 5: Clean up in Lightsail
Once the EC2 instance works, the Lightsail side is still billed: the instance, the snapshot and any static IP.
aws lightsail delete-instance --instance-name my-instance
aws lightsail delete-instance-snapshot --instance-snapshot-name my-snapshot-20261010
aws lightsail release-static-ip --static-ip-name my-static-ip
Disk snapshots can be exported the same way (export-snapshot with a disk snapshot name); they appear in EC2 as EBS volumes.
Comments